Archiving Data to Elm from Sherlock#
elm_archive#
Archiving large datasets with numerous small files can be challenging. elm_archive is a utility designed to streamline the archival process of data from Sherlock to Elm storage using Globus. This command line tool is particularly beneficial for archiving numerous small files that are not ideally suited for Elm and tape storage.
What can elm_archive do for me?#
elm_archive consolidates your files into one or more tar files, and uploads them to Elm for safekeeping. While direct upload is ideal for large files (greater than 1 GB), elm_archive is highly recommended for efficiently archiving directories with many small files from Sherlock to Elm.
Using larger tar files in Elm improves performance and makes future data restoration easier. You can later retrieve specific small files by downloading the relevant tar files and extracting only the needed items.
How does elm_archive work?#
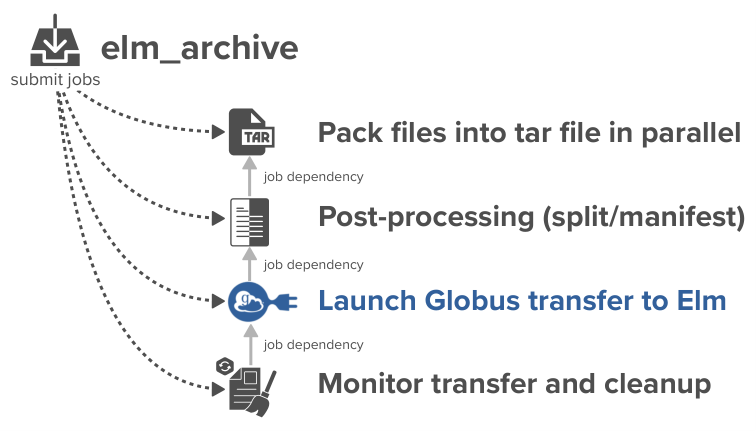
elm_archive runs from Sherlock and orchestrates a chain of dependent Slurm jobs to automate the entire archival process. It handles:
- Packing: Consolidating files into
.tararchives using the paralleldtartool. - Post-Processing: Splitting oversized archives and creating manifests for each one.
- Transfer: Submitting the data transfer to Elm via Globus.
- Monitoring & Cleanup: A recurring job monitors the Globus transfer's progress. Upon completion (success or failure), it automatically cleans up all temporary data from your
$SCRATCHdirectory.
This workflow is designed for unattended execution; you can submit a transfer and the script will handle the rest, even if you log out.
Workflow#
Step 1: Register an Elm Access Key#
1. Retrieve Access Key & Secret#
- Log in to Elm's MinIO console: https://campus.elm.stanford.edu:9001/
- Create a new Access Key (recommended: descriptive name, e.g., "sherlock-elm-archive")
- Optionally restrict your key’s permissions (Globus & Elm Documentation)
- Copy the Access and Secret Keys for the next step (keep them secure and do not share them)
2. Load Keys in Globus#
- Visit the Stanford Elm Storage (project: campus) Credentials
- Add your Elm bucket and paste your Elm Access and Secret Keys
- Finish by clicking "Add Key"
Step 2: Log in to Globus from Sherlock#
Use our wrapper to authenticate to Globus and grant required consents:
$ elm_archive auth
Follow browser prompts and return tokens when requested. You'll authenticate once for Globus and each endpoint (source and destination).
Step 3: Initiate a Transfer#
From a Sherlock login node, start a transfer using the elm_archive transfer command.
Basic example:
$ elm_archive transfer /path/to/source elm-bucket/prefix/
/path/to/sourceis any directory on Sherlock where you have the necessary permissions. This includes any of the shared filesystems, such as/oak. For more information on filesystems, visit the Sherlock Filesystems Documentation.elm-bucket/prefixis your Elm bucket and destination path. Subfolders are created automatically.
Transfer Label
By default, the source directory name is used as a label for log files, tar files, manifests, and Globus tasks. You can specify a custom label:
$ elm_archive transfer --label projectA-2025 /path/to/source elm-bucket/prefix/
Job Options#
elm_archive provides several options for customizing how archiving jobs are run on Sherlock. You can adjust key Slurm job parameters (like partition, number of tasks, wall time, and constraints) to optimize resource usage, accommodate larger datasets, or integrate with your group’s workflows.
Example: Customizing Resources#
Suppose you have a large dataset and prefer your owner's partition for more performance. You want to run with 8 tasks and give the job up to 8 hours. You would use:
elm_archive transfer -p owner_partition -n 8 -t 8:00:00 /path/to/dataset elm-bucket/prefix/
Here's what each option means in detail:
| Option | Description |
|---|---|
-p owner_partition | Use your own Slurm partition (default is service). This will allow more resources and longer run times. |
-n 8 | Request 8 parallel tasks (ntasks). More tasks often speeds up packing, especially for many small files. Default is 8. |
-t 8:00:00 | Allow up to 8 hours wall time for the job. Increase this for very large datasets or slow packing. Default is 2 hours. |
Other useful job options:
| Option | Description |
|---|---|
-C, --constraint <constraint> | Set a Slurm constraint (e.g., request specific hardware nodes). |
--mail-type <type> | Specify email notification preferences for Slurm jobs (e.g., END, FAIL). |
Quick Start for requesting Custom Resources#
-
For more CPUs (parallelism) or longer job time, adjust
-nand-t:(elm_archive transfer -n 16 -t 1-0 /path/to/data elm-bucket/prefix/1-0is one day) -
For large datasets, switch to your group's partition:
elm_archive transfer -p mygroup /path/to/data elm-bucket/prefix/ - For more control (e.g. label, splitting), combine options:
elm_archive transfer --label myproject \
  -p mypartition \
  -n 32 \
  -t 2-00:00:00 \
  -s 1000 \
  /path/to/source elm-bucket/prefix/
Tip: Find your available partitions and groups using sh_part. See Sherlock's Available Resources page for more info.
Tar File Management and Thresholds#
Splitting Tar Files#
If your dataset exceeds a specified size (default: 1 TiB), elm_archive automatically splits it into multiple standalone tar files using tarsplitter.
Note: Each tar file can be downloaded and extracted on its own—you do not need to reassemble tar files to restore individual files. In addition, elm_archive provides a separate manifest file (tar.txt) listing the contents of each tar.
Best Practices#
-
Specifying Split Size: Adjust the split size with the
-sflag. For example, to split files at every 500 GiB:elm_archive transfer ... -s 500 ... -
Thresholds & Restore Speed: Setting a smaller split size (e.g., reducing from 1 TiB to 250 GiB using
-s 250) enables faster restores; you’ll need to download only a smaller tar file to recover a specific file. This is especially useful when restoring on a machine with limited storage, such as a laptop.
Conversely, increasing the split size (e.g., from 1 TiB to 4 TiB with-s 4096) means fewer but larger tar files, which can speed up bulk restores of very large datasets. -
Minimum Split Size: The split threshold must be greater than the largest single file in your dataset, as each file is stored whole in a tar (no file is split across tar files).
Note:elm_archivewill automatically verify the size of the largest file to be archived. If the largest file is bigger than your chosen split size,elm_archivewill abort. -
The maximum tar size allowed by Elm's S3 protocol is 5 TiB. For largest possible tar files, we recommend to use
-s 5000.
Restoring and Extracting Data From Elm Archives#
You can restore files from Elm by downloading the corresponding tar and manifest files. Each tar file can be used independently; you do not need to merge or process multiple tar files.
Step-by-Step Extraction:
-
Inspect Manifest: The manifest
.tar.txtis the output oftar -tvf, listing files in that tar.awk '{for(i=6;i<=NF;i++) printf "%s%s", $i, (i==NF?"\n":" ")}' archive.tar.txt > archive.paths.txt -
Select Needed Files:
grep wanted_pattern archive.paths.txt > archive.to_extract.txt -
Extract Selected Files: Make sure your extraction job is allocated enough time (extracting large tars can take hours):
tar -xvf archive.tar --files-from=archive.to_extract.txt
Notes:
- You can use any standard tar command.
- Each tar file stands alone.
Non-Blocking Submission with --headless#
For automation workflows (e.g., job dependencies), elm_archive transfer --headless submits all jobs required for archiving, prints the chain of Slurm job IDs, and exits immediately—it does not block for the full workflow. Thus, it is possible to use job dependency to chain your own jobs.
How to get elm_archive's last job ID for job dependency:
tmpfile=$(mktemp)
elm_archive transfer --headless ... | tee "$tmpfile"
archive_rc=${PIPESTATUS[0]}   # exit code of elm_archive
tee_rc=${PIPESTATUS[1]}       # (usually zero unless disk full)

if [[ $archive_rc -ne 0 ]]; then
    echo "ERROR: elm_archive failed with exit code $archive_rc"
    # ...handle error...
fi

cleanup_jobid=$(awk -F': ' '/^elm_globus_cleanup:/ {print $2}' "$tmpfile")

# use $cleanup_jobid for job dependency, for example:
# sbatch --dependency=afterok:$cleanup_jobid my_next_job.sh
Summary of misc. options#
| Option | Description |
|---|---|
-r, --reattach <label.XXXXX> | Reattach to an existing transfer session (resume monitoring interrupted job/logs). |
-s, --size-threshold <N> | Split tar files when exceeding N GiB (default: 1024). Lower for easier restore, must be >= largest file. |
--headless | Submit jobs and print the job ID chain, then exit immediately (useful for scripting, pipelines, etc.). |
-l, --label <label> | Set a custom label for files/logs (defaults to source directory name). |
--tar-only | Creates tar files and manifests in $SCRATCH but does not start the Globus transfer. This is useful for inspecting archives before a manual transfer. Note: The transfer cannot be resumed by elm_archive later. Since automated cleanup is bypassed, you must manually remove the generated tar files from $SCRATCH once you are done to conserve your quota space. |
See all options with:
elm_archive --help
Monitoring Transfers#
You can monitor the progress of your active and completed transfers at any time using the elm_archive status command. This provides a clean, at-a-glance view of all your recent archiving sessions.
Understanding the status table#
Running elm_archive status on a Sherlock login node will display a table similar to this:
$ elm_archive status
SUBMITTED          STATE        STAGE        SIZE/INO      PROGRESS     DURATION   SESSION_LABEL           DESTINATION
2025-10-18 09:31   COMPLETED    Cleaned      1.2T/1.1M     -            1h45m      myoldproject1.ek3oCI    my-bucket/archived_projects/
2025-10-18 10:28   FAILED       Transfer     500G/850k     FAILED       2h15m      myoldproject2.mXYN1J    my-bucket/archived_projects/
2025-10-18 10:39   RUNNING      Packing      2.1T/3.5M     78%          45m+       largedata.yZulTZ        my-bucket/rawdata/
2025-10-18 11:05   RUNNING      Post-Proc    890G/500k     -            12m+       dataset-final.aBCdE1    my-bucket/final/
2025-10-18 11:15   RUNNING      Packing      -             Queued       2m+        new-analysis.fG2hI3     my-bucket/analysis/
At the bottom, a helpful hint will appear if you have any running jobs:
2025-10-18 11:30:00 - To reattach to the most recent running session, use:
    elm_archive transfer --reattach largedata.yZulTZ
Copy-paste this command to attach the session's logs (you can then detach with Control-C at any time).
Column Explanations#
| Column | Description |
|---|---|
| SUBMITTED | The date and time you initiated the transfer. All entries are sorted chronologically. |
| STATE | The overall condition of the workflow: RUNNING (Yellow), COMPLETED (Green), or FAILED (Red). This is your primary indicator of the job's health. |
| STAGE | The specific step the workflow is currently in, or where it failed: |
Init: The session is being created. | |
Packing: Consolidating files into a .tar archive. A pre-analysis (dwalk) runs first. | |
Post-Proc: Splitting large tar files and/or generating manifests. | |
Queuing: The Globus transfer job is submitted and waiting to run. | |
Transfer: Actively transferring data to Elm via Globus. | |
Cleanup: Removing temporary files from $SCRATCH after a successful Globus transfer. | |
Cleaned: The final stage for a COMPLETED job where temporary files were removed. | |
Packed: The final stage for a COMPLETED job run with --tar-only. | |
| SIZE/INO | The total size and number of files (inodes) in the source directory, as calculated by dwalk. Example: 1.2T/1.1M means 1.2 Terabytes and 1.1 million files. |
| PROGRESS | Context for the current stage: |
Queued: The Slurm job for this stage is waiting to start. | |
Analyzing: The pre-packing file scan (dwalk) is running. | |
XX%: Percentage completion for the Packing or Transfer stage. | |
Submitted: The transfer has been submitted to Globus but is not yet active. | |
PAUSED(XX%): The Globus transfer has been paused. The job is still RUNNING but no data is moving. | |
FAILED/SUCCEEDED: The final status of the Globus transfer, visible before cleanup runs. | |
| DURATION | The total time the job has been running. A + suffix (e.g., 1h15m+) indicates the job is still active. |
| SESSION_LABEL | The unique identifier for this session. Use this label with the --reattach flag. |
| DESTINATION | The bucket and prefix in Elm where your files will be archived. |
Customizing the status view#
The status command can be modified with flags to provide more detailed information or to filter the output.
| Option | Description |
|---|---|
--running | Show only transfers that are currently active. |
--failed | Show only transfers that have failed, which is useful for quickly identifying problems. |
--completed | Show only successfully completed transfers. |
--last | Show only the most recent transfer session. |
--all | Show your complete transfer history (default is the last 30 days). |
--full | Display the full source and destination paths on new lines. |
--globus | Display a direct link to the Globus task page for each transfer. |
--debug | Display detailed troubleshooting information for advanced users. |
Live Monitoring a Transfer#
For a real-time, auto-updating view of your most recent transfer, you can use the watch command:
watch -n 10 --color elm_archive status --last
This command provides a live dashboard of your transfer by running elm_archive status --last every 10 seconds, with colors intact. Press Ctrl+C to exit the live view.
Filtering the view#
To help you quickly find the transfers that matter most, you can filter the status list. For example, to see all jobs that are not yet successfully completed (i.e., they are either running or have failed), you can combine flags:
$ elm_archive status --running --failed
When using --all to view your entire transfer history, keep in mind that the session logs for elm_archive are stored in your $SCRATCH directory (inside $SCRATCH/.elm_archive/). Due to Sherlock's 90-day purge policy on $SCRATCH, transfer history older than 90 days may not be available.
Debugging a transfer#
The --debug flag provides technical details essential for troubleshooting. It shows the live status of the underlying Slurm jobs and the latest information from Globus.
$ elm_archive status --debug --last
SUBMITTED          STATE     STAGE      SIZE/INO    PROGRESS   DURATION   SESSION_LABEL
2025-10-18 17:09   RUNNING   Transfer   4.5T/8.9M   75%        2h28m+     largedata.jOJMY9
  ├── DEBUG INFO
  │   ├── Session Directory: /scratch/users/jane/.elm_archive/largedata.jOJMY9
  │   ├── Cleanup Status:    Incomplete
  │   ├── SLURM Job IDs:
  │   │   - Packing:       7832699
  │   │   - Post-Proc:     7832700
  │   │   - Xfer-Submit:   7832701
  │   │   - Cleanup:       7832702 (RUNNING)
  │   └── globus_task_status:
  │       Label:                  elm_archive:largedata.jOJMY9
  │       Status:                 ACTIVE
  │       Is Paused:              False
  │       Total Subtasks:         4
  │       Subtasks Succeeded:     3
  │       ...
What this tells you:
- Session Directory: The location of all logs and metadata for this job in
$SCRATCH. - Cleanup Status: Shows if the final cleanup job has run.
- SLURM Job IDs: Lists each job in the workflow. The status in parentheses (e.g.,
RUNNING,PENDING) is its live status from the Slurm scheduler. - globus_task_status: A snapshot of the last known status of the Globus transfer, as seen by the cleanup job.
Limitations#
- Tar files are written to your
$SCRATCH(100 TB quota). To stage elsewhere (e.g.,/oak), symlink$SCRATCH/.elm_archiveas needed.
Support#
Stanford Research Computing maintains this tool. For help, contact srcc-support@stanford.edu (mention "elm_archive" in your subject).